Onboard a company
Streamline company setup, ensure regulatory compliance, and prepare for payroll activation
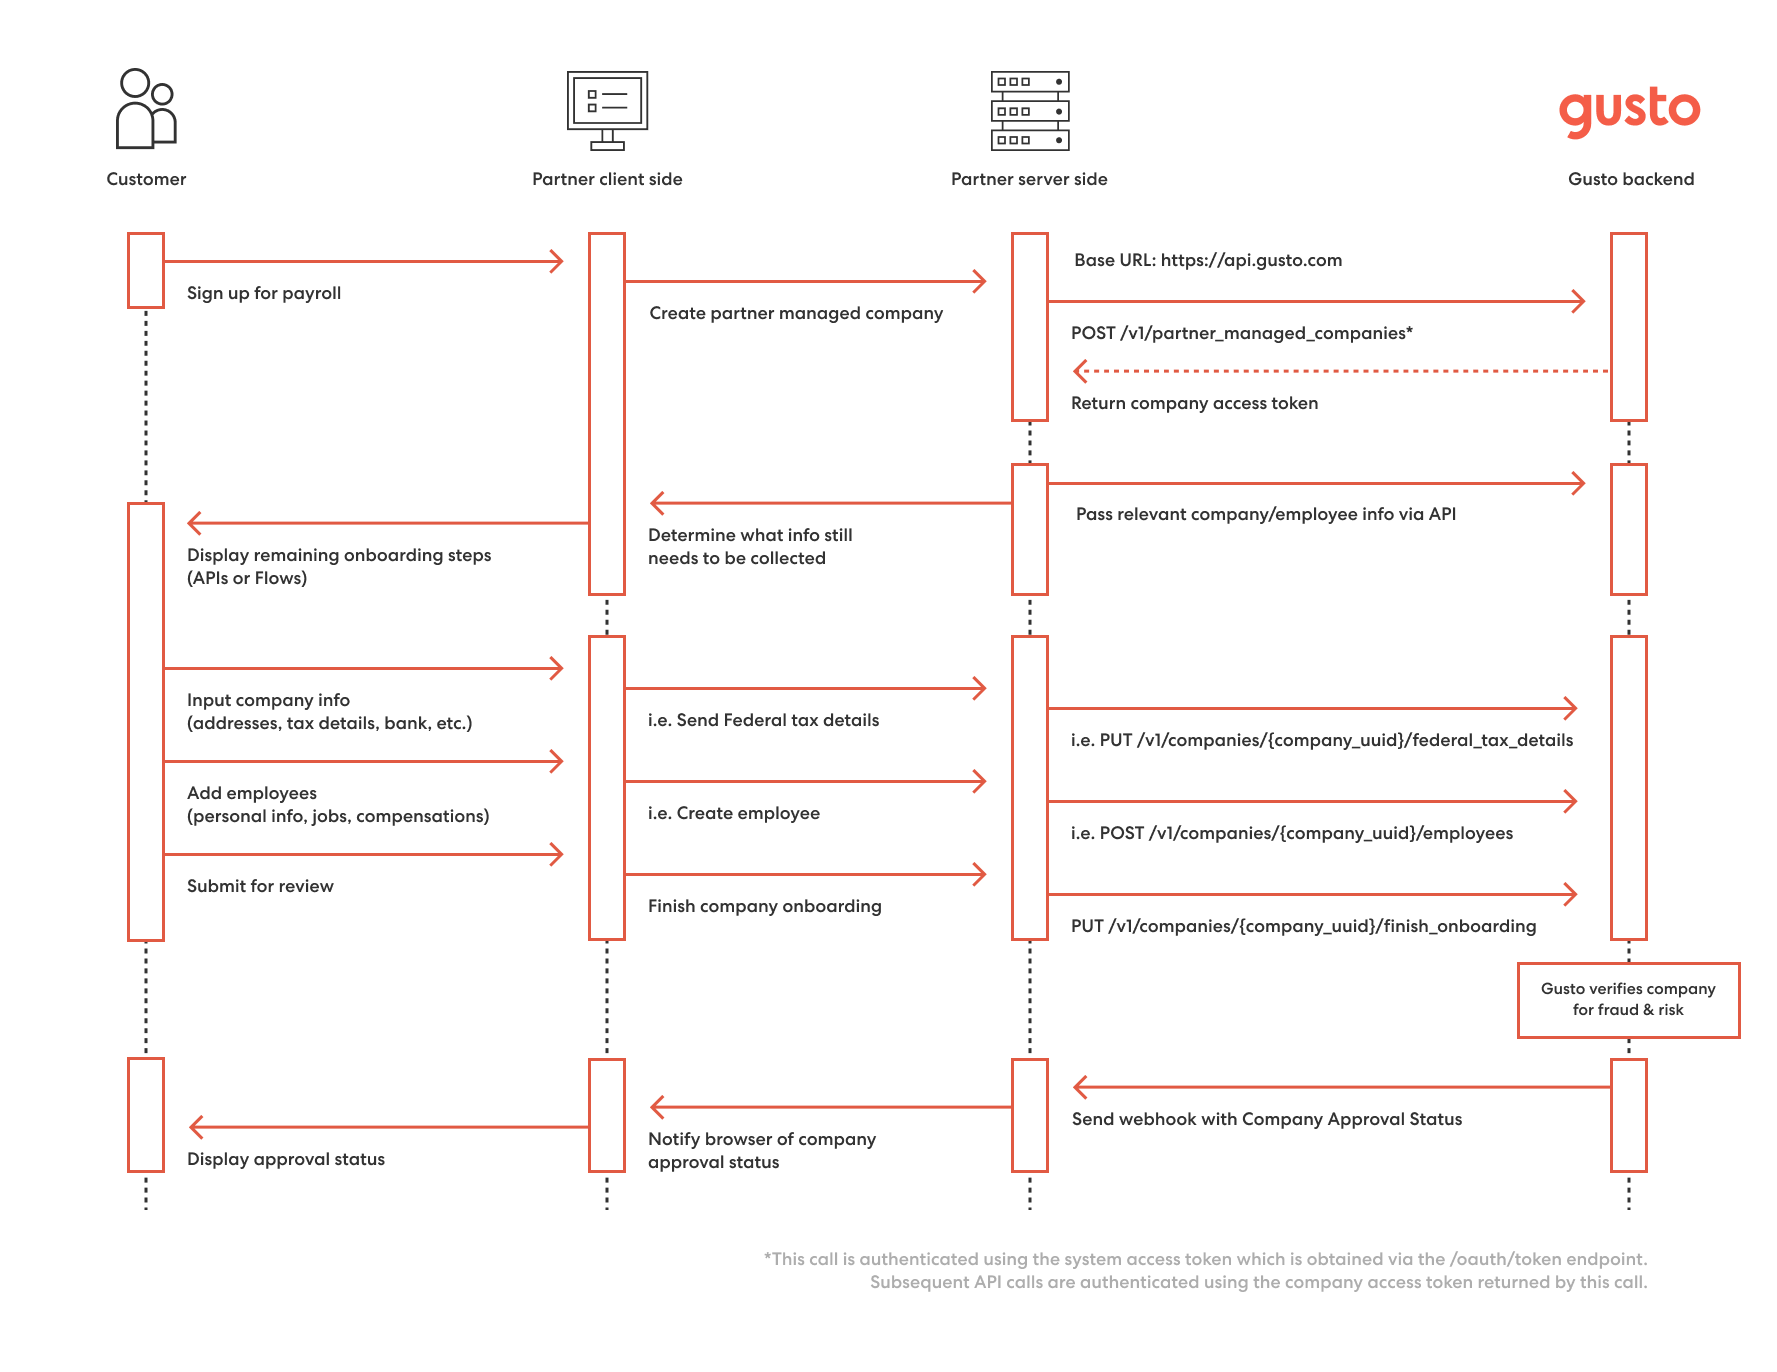
This guide walks you through onboarding a company to Gusto Embedded Payroll — how the steps connect and what order to complete them in. For request/response details, see the linked API reference documentation throughout.
For an overview of onboarding steps and requirements for proceeding through onboarding, see the Onboarding process overview. All API calls required for onboarding a company are described in this quick reference.
PrerequisitesBefore using this guide you must have a developer account and created an application. To learn more about these steps, review the Quickstart guide.
Onboarding process overview
Use GET /v1/companies/{company_uuid}/onboarding_status to check progress at any point.
- Create company + accept Terms of Service
- Company setup (can run in parallel):
- Add company locations
- Add bank account
- Set federal tax details
- Set industry
- Create pay schedule
- Employee setup:
- Create employees
- Assign work addresses
- Complete employee onboarding
- State tax setup
- Verify bank account (after micro-deposits arrive)
- Create signatory + sign forms
- Finish onboarding
- Wait for approval (1-2 business days)
Step-by-step requirements
Step unblock and completion requirements
| Step ID | Unblocked by | Completed when |
|---|---|---|
add_addresses | Terms of Service accepted | At least one location has filing_address: true, at least one has mailing_address: true (can be same location), and all employee work locations are added |
add_bank_info | Terms of Service accepted | A bank account exists |
federal_tax_setup | Terms of Service accepted | All four fields are set: ein, tax_payer_type, filing_form, legal_name |
select_industry | Terms of Service accepted | A valid naics_code is set |
payroll_schedule | Terms of Service accepted | A pay schedule exists with valid frequency, anchor_pay_date, and anchor_end_of_pay_period |
add_employees | add_addresses complete | At least one employee has onboarding_status of onboarding_completed |
state_setup | At least one employee has work location assigned | All required states have ready_to_run_payroll: true |
verify_bank_info | add_bank_info complete AND micro-deposits arrived (1-2 business days) | Bank account verification_status is verified |
sign_all_forms | add_addresses, federal_tax_setup, and payroll_schedule complete | Signatory has identity_verification_status of Pass or Skipped, AND all forms with requires_signing: true are signed |
Step 1: Create company and accept Terms of Service
Create a partner managed company
Call POST /v1/partner_managed_companies using your system-level access token.
Save the returned company_uuid, access_token, and refresh_token. All subsequent API calls for this company use the company-scoped access_token.
Payroll administratorsThe user created in this request becomes the primary payroll administrator. Add more using POST /v1/companies/{company_id}/admins.
Accept Terms of Service
Call POST /v1/partner_managed_companies/{company_uuid}/terms_of_service.
The user must exist in Gusto as a payroll admin before accepting. If not, first create an admin record.
Partners may either embed a link to the Terms of Service in a disclaimer (e.g., "By continuing, I agree to the Gusto Embedded Payroll Terms of Service") or display the terms in an iframe. Either way, the user must explicitly accept via a checkbox or button.
Step 2: Company setup
These steps have no dependencies on each other and can run in parallel.
Add company locations
Onboarding step ID: add_addresses
Companies must provide mailing and filing addresses, plus all US locations where employees work (including remote/home addresses).
Call POST /v1/companies/{company_id}/locations for each location.
Add bank account
Onboarding step ID: add_bank_info
Call POST /v1/companies/{company_id}/bank_accounts. If a default bank account exists, the new one replaces it as the default funding method.
This triggers micro-deposits that arrive in 1-2 business days. You'll verify these later. Alternatively, use POST /v1/plaid/processor_token to connect via Plaid and skip micro-deposit verification.
Set federal tax details
Onboarding step ID: federal_tax_setup
Refer to the company's IRS Form CP-575 for this information.
- Call GET /v1/companies/{company_id}/federal_tax_details to retrieve the current
version - Call PUT /v1/companies/{company_id}/federal_tax_details to update
Set industry
Onboarding step ID: select_industry
Call PUT /v1/companies/{company_uuid}/industry_selection with the company's NAICS code and SIC codes.
NAICS and SIC codes
- NAICS: Six-digit code based on the primary type of work the business performs
- SIC: Four-digit code categorizing industry based on business activities
Use the Middesk API to look up industry classification codes, or search manually at naics.com.
Create pay schedule
Onboarding step ID: payroll_schedule
Call POST /v1/companies/{company_id}/pay_schedules.
Set anchor_pay_date with buffer for onboarding completion plus risk review (up to 2 business days). If the anchor date passes before approval, Gusto automatically adjusts to the next valid pay date.
See Create a pay schedule for details.
Step 3: Employee setup
Create employees
Onboarding step ID: add_employees
Call POST /v1/companies/{company_id}/people_batches to create multiple employees in a single request.
This processes asynchronously — poll GET /v1/people_batches/{people_batch_uuid} to check status.
Recommended for onboarding multiple employees at once.
Call POST /v1/companies/{company_id}/employees for each employee.
Set self_onboarding: true for employees to enter their own information, or false for the payroll admin to enter it.
Best for adding one or two employees.
See Onboard a W2 Employee for the full walkthrough.
Assign work addresses
Call POST /v1/employees/{employee_id}/work_addresses to assign each employee to a company location.
Employee work addresses determine which states appear in state tax setup.
Complete employee onboarding
At least one employee must complete their individual onboarding (personal details, compensation, tax setup, etc.) before the company can finish onboarding.
See Onboard a W2 Employee for details.
Step 4: State tax setup
Onboarding step ID: state_setup
State tax requirements are generated based on employee work addresses. For each state:
- Call GET /v1/companies/{company_uuid}/tax_requirements/{state} to retrieve requirements
- Call PUT /v1/companies/{company_uuid}/tax_requirements/{state} to submit
Each state has different fields — call GET to discover what's needed.
Step 5: Verify bank account
Onboarding step ID: verify_bank_info
Micro-deposits arrive 1-2 business days after creating the bank account. The verification_status progresses: awaiting_deposits → ready_for_verification → verified.
- Call GET /v1/companies/{company_id}/bank_accounts to check status
- When
verification_statusisready_for_verification, call PUT /v1/companies/{company_id}/bank_accounts/{bank_account_uuid}/verify with the deposit amounts
Demo environmentUse POST /v1/companies/{company_id}/bank_accounts/{bank_account_uuid}/send_test_deposits to simulate micro-deposits instantly.
Step 6: Add signatory and sign forms
Onboarding step ID: sign_all_forms
Add a signatory
The signatory must be an officer, owner, general partner, LLC member manager, plan administrator, fiduciary, or authorized representative designated to sign on the company's behalf.
Call POST /v1/companies/{company_uuid}/signatories.
Only one primary signatory per company. To replace, first delete the existing signatory. You can also invite a signatory with minimal information and complete their profile later via update signatory.
After creation, check identity_verification_status:
| Status | Can sign forms? |
|---|---|
Pass | Yes |
Fail | No — create a new signatory |
Skipped | Yes, except Form 8655 (requires wet signature) |
Sign documents
- Call GET /v1/companies/{company_id}/forms to retrieve forms
- Optionally preview PDFs via GET /v1/forms/{form_uuid}/pdf
- For each form where
requires_signing: true, call PUT /v1/forms/{form_id}/sign
Form 8655 regenerationForm 8655 regenerates (requiring re-signature) when:
- Signatory information changes
- Anchor pay date moves to an earlier month
- Company data (EIN, name, filing address) is modified
Subscribe to webhooks for
form.updatedto detect when forms need re-signing.
Step 7: (Optional) Add historical payrolls
For companies switching from another provider mid-year, add historical payrolls to ensure accurate year-to-date tax filings and a single W-2 for employees.
See Create a historical payroll.
Step 8: Finish onboarding
- Call GET /v1/companies/{company_uuid}/onboarding_status and confirm all steps show
completed: true - Call PUT /v1/companies/{company_uuid}/finish_onboarding
Gusto's Risk team then reviews the company — this can take up to 2 business days though auto-approval can happen in as little as 15 minutes.
Demo environmentUse PUT /v1/companies/{company_uuid}/approve to simulate approval instantly.
Step 9: Monitor webhook for approval
Subscribe to webhooks and listen for company.approved to know when the company can run payroll.
Post-onboarding updatesUse Company and Employee endpoints to make changes after onboarding. If using Flows, revisit them for adjustments — except state tax information, which requires contacting Support.
Step 10: Planning for first pay day
The anchor pay date is the first date employees are paid with Gusto.
If an anchor pay date is missed, Gusto will automatically update the pay schedule. Using the existing pay schedule's frequency, the anchor dates anchor_pay_date and anchor_end_of_pay_period will be automatically moved forward to the next valid set of dates.
If you change a company's anchor pay date to an earlier month before running the first payroll, Form 8655 must be re-signed.
See Create a pay schedule for more details.
Quick reference: API endpoints
View complete API endpoint list
1. Create company
POST /v1/partner_managed_companies
POST /v1/partner_managed_companies/{company_uuid}/terms_of_service
2. Company setup (run in parallel)
POST /v1/companies/{company_uuid}/locations
POST /v1/companies/{company_uuid}/bank_accounts
GET  /v1/companies/{company_uuid}/federal_tax_details
PUT  /v1/companies/{company_uuid}/federal_tax_details
PUT  /v1/companies/{company_uuid}/industry_selection
POST /v1/companies/{company_uuid}/pay_schedules
3. Employee setup
POST /v1/companies/{company_uuid}/employees
POST /v1/employees/{employee_uuid}/work_addresses
4. State tax setup (requires employee work addresses)
GET  /v1/companies/{company_uuid}/tax_requirements/{state}
PUT  /v1/companies/{company_uuid}/tax_requirements/{state}
5. Bank verification (after micro-deposits arrive)
GET  /v1/companies/{company_uuid}/bank_accounts
PUT  /v1/companies/{company_uuid}/bank_accounts/{bank_account_uuid}/verify
6. Signatory and forms
POST /v1/companies/{company_uuid}/signatories
GET  /v1/companies/{company_uuid}/forms
PUT  /v1/forms/{form_uuid}/sign
7. Finish onboarding
GET  /v1/companies/{company_uuid}/onboarding_status
PUT  /v1/companies/{company_uuid}/finish_onboarding
8. Approval
Listen for company.approved webhookRelated guides
Architecture diagram
Updated about 1 month ago