Migrate an existing company
Learn how to migrate a Gusto.com company to your Embedded Payroll system
For existing Gusto.com customers, you can migrate their company to your Embedded Payroll product, using OAuth2 for authentication, instead of creating a new company for them. Find libraries supporting OAuth on the OAuth2 homepage.
Only primary or full-access admins can authorize new apps. Some users manage payroll for multiple companies and must select which one to connect to during authorization, so your integration should be ready to handle this.

1. OAuth connect
Securely connect an existing Gusto company to your Embedded Payroll integration using the OAuth authentication flow. This ensures only authorized administrators can grant access and maintain control over their company data.
Below is an overview of the OAuth flow:
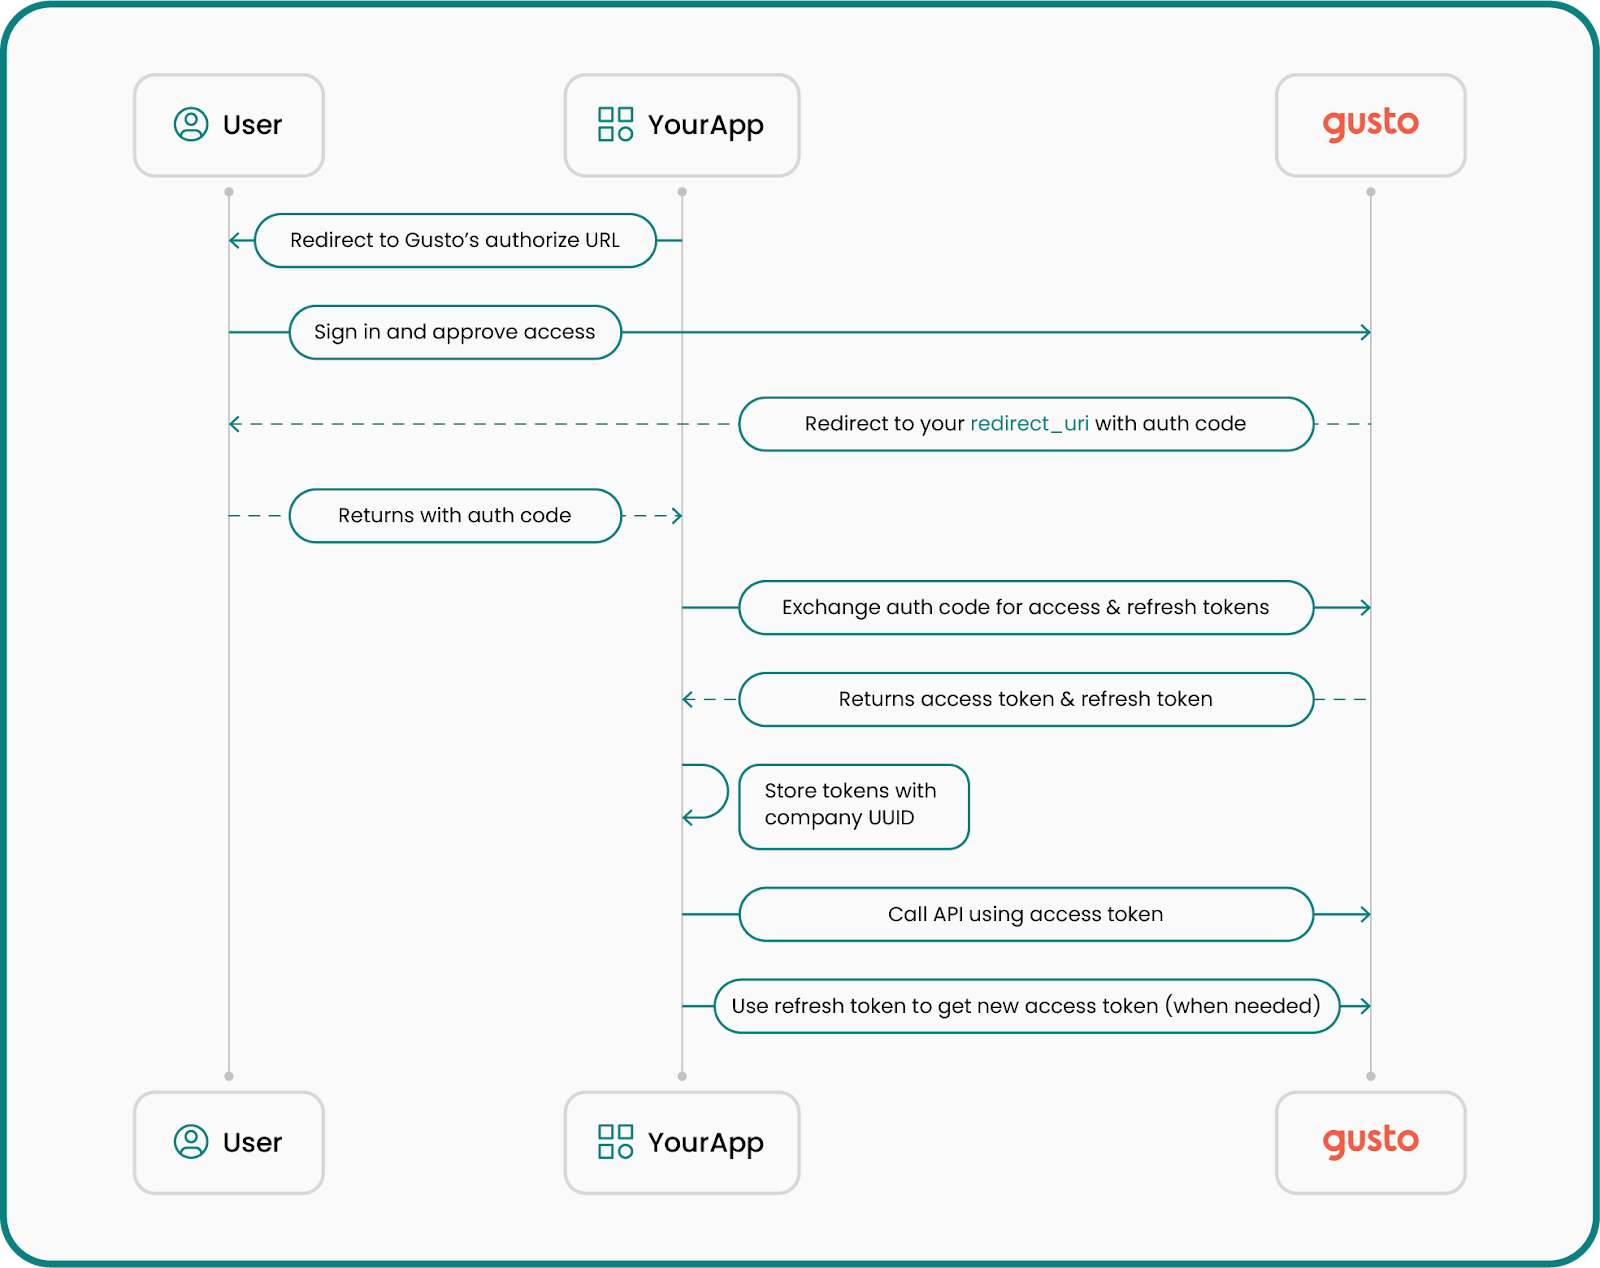
Retrieve an authorization code
To begin the migration, the company’s primary or full-access administrator must approve your application accessing their information on Gusto.
They’ll be directed to Gusto’s login and authorization screen, where they authenticate and grant your application permission.
The Gusto login screen can be loaded in a new window or tab, but cannot be loaded in an iframe.
Authorization URL structure
https://api.gusto.com/oauth/authorize?client_id=YOUR_CLIENT_ID&redirect_uri=YOUR_REDIRECT_URI&response_type=codeParameters
client_id: Your application’s unique identifier, generated for you when you create an app in the Gusto Developer Portal.redirect_uri: Sometimes called a “callback URI,” this is the URL to which the user will be redirected after authorization. OAuth does not support wildcard URIs or URIs with fragments (e.g #).response_type: Always set tocode.
After successful authentication, Gusto redirects the user to your redirect_uri, appending an authorization code as a query parameter:
https://example.com/callback?code=AUTHORIZATION_CODEThe authorization code is valid for 10 minutes. It must be exchanged for an access token before it expires.
Exchange the authorization code for an access token
Once you have the authorization code, exchange it for an access token by making a POST /oauth/token request.
Sample request
curl --request POST \
  --url https://api.gusto.com/oauth/token \
  --header 'Content-Type: application/json' \
  --data '{
    "client_id": "YOUR_CLIENT_ID",
    "client_secret": "YOUR_CLIENT_SECRET",
    "redirect_uri": "https://example.com/callback",
    "code": "AUTHORIZATION_CODE",
    "grant_type": "authorization_code"
  }'
Sample response
{
  "access_token": "de6780bc506a0446309bd9362820ba8aed28aa506c71eedbe1c5c4f9dd350e54",
  "token_type": "bearer",
  "expires_in": 7200,
  "refresh_token": "8257e65c97202ed1726cf9571600918f3bffb2544b26e00a61df9897668c33a1"
}
You’ll use the access token in the Authorization header when calling the API. Tokens are tied to one company. For guidance on refreshing and storing tokens, see Authentication and authorization.
2. Retrieve company UUID from the token
After obtaining an access token, use the GET /v1/token_info endpoint to retrieve the company's unique identifier.
Sample request
curl --request GET \
  --url https://api.gusto-demo.com/v1/token_info \
  --header 'accept: application/json' \
  --header 'authorization: Bearer COMPANY_ACCESS_TOKEN'
Sample response
{
  "resource_type": "Company",
  "resource_uuid": "123e4567-e89b-12d3-a456-426614174000"
}
3. (Recommended) Pre-flight check for migration readiness
Before prompting the user to accept Terms of Service or attempting migration, call the migration readiness endpoint to get a comprehensive list of blockers and warnings relevant to that company.
This helps you:
- Show users everything they must fix upfront (instead of failing migration one blocker at a time).
- Provide a more predictable, consistent migration UX.
Get migration readiness
Endpoint: GET /v1/partner_managed_companies/{company_uuid}/migration_readiness
Behavior notes
- Readiness returns HTTP 200 with a
ready_to_migrateboolean pluserrorsandwarnings. - Treat
errorsas blocking andwarningsas non-blocking. - These blockers will also be enforced as hard guardrails in the migrate endpoint.
Sample response (200):
{
  "ready_to_migrate": false,
  "company_uuid": "123e4567-e89b-12d3-a456-426614174000",
  "errors": [
     {
      "error_key": "base",
      "category": "migration_blocker",
      "message": "Operation cannot be performed because the company is enrolled in benefits that must be disconnected before continuing.",
      "metadata": { "key": "gusto_managed_benefits" }
    }
  ],
  "warnings": [
    {
      "error_key": "base",
      "category": "migration_warning",
      "message": "This company is a marijuana related business.",
      "metadata": { "key": "marijuana_related_business" },
    }
  ]
}
How to use readiness results
- If
ready_to_migrateisfalse(i.e.,errorsis non-empty), do not call migrate yet. Show each error message to the user and provide clear next steps. - Show
warningsas informational context. Warnings should not block migration, but they may affect whether a partner chooses to proceed. - Important: Any item that is an “error” in readiness is expected to be enforced as a hard guardrail in the migrate endpoint as well.
4. Accept terms of service (TOS)
Once you’ve surfaced readiness issues and the user is ready to proceed, accept Gusto’s Terms of Service.
At least one active admin must explicitly accept the latest TOS, and this acceptance is required for migration.
The user who authenticated is now the primary payroll administrator of the migrated company, but you can also add or change administrators using the POST /v1/companies/{company_id}/admins endpoint. See the below section for request/response examples.
Each company you want to migrate must accept the Terms of Service using the company uuid and calling POST /v1/partner_managed_companies/{company_uuid}/terms_of_service.
Sample request
curl --request POST \
  --url https://api.gusto-demo.com/v1/partner_managed_companies/123e4567-e89b-12d3-a456-426614174000/terms_of_service \
  --header 'accept: application/json' \
  --header 'authorization: Bearer COMPANY_ACCESS_TOKEN' \
  --header 'content-type: application/json' \
  --data '{
    "email": "[email protected]",
    "external_user_id": "USER_12345",
    "ip_address": "192.168.1.1"
  }'
Sample response
{
  "latest_terms_accepted": true
}
5. Migrate the company
After the company is ready—meaning there are no readiness errors—and the Terms of Service have been accepted, finalize the migration using the PUT /v1/partner_managed_companies/{company_uuid}/migrate endpoint. This endpoint enforces the same error blockers as readiness (hard guardrails).
Sample request
curl --request PUT \
  --url https://api.gusto-demo.com/v1/partner_managed_companies/123e4567-e89b-12d3-a456-426614174000/migrate \
  --header 'accept: application/json' \
  --header 'authorization: Bearer COMPANY_ACCESS_TOKEN' \
  --header 'content-type: application/json'
Sample response (200)
{
  "migration_status": true,
  "company_uuid": "123e4567-e89b-12d3-a456-426614174000",
  "errors": [],
  "warnings": [
    {
      "error_key": "base",
      "category": "migration_warning",
      "message": "This company is a marijuana related business.",
      "metadata": { "key": "marijuana_related_business" },
    }
  ]
}
Blocked response (422)
{
  "errors": [
    {
      "error_key": "base",
      "category": "migration_blocker",
      "message": "Operation cannot be performed because the company is enrolled in benefits that must be disconnected before continuing.",
      "metadata": { "key": "gusto_managed_benefits" }
    }
  ]
}
(Recommended) Add/change admin users
Add administrators or change the administrator with the POST /v1/companies/{company_id}/admins endpoint.
Sample request
curl --request POST \
  --url https://api.gusto-demo.com/v1/companies/123e4567-e89b-12d3-a456-426614174000/admins \
  --header 'accept: application/json' \
  --header 'authorization: Bearer COMPANY_ACCESS_TOKEN' \
  --header 'content-type: application/json' \
  --data '{
    "first_name": "Harold",
    "last_name": "Hill",
    "email": "[email protected]"
  }'
const fetch = require('node-fetch');
const url = 'https://api.gusto-demo.com/v1/companies/company_id/admins';
const options = {
method: 'POST',
headers: {
accept: 'application/json',
'content-type': 'application/json',
authorization: 'Bearer COMPANY_ACCESS_TOKEN'
},
body: JSON.stringify({first_name: 'Harold', last_name: 'Hill', email: '[email protected]'})
};
fetch(url, options)
.then(res => res.json())
.then(json => console.log(json))
.catch(err => console.error('error:' + err));Sample response
{
  "id": "987654321",
  "first_name": "Harold",
  "last_name": "Hill",
  "email": "[email protected]",
  "role": "payroll_admin",
  "company_id": "123e4567-e89b-12d3-a456-426614174000"
}
Updated about 1 month ago